Add a Domain to an Event Website
Domains in TicketSignup
TicketSignup allows you to use your own custom domain with your event website for free. By bringing your own domain to TicketSignup, you are able to have a dynamic, data-driven website that features your brand, not TicketSignup. TicketSignup provides the hosting and SSL certificates free of charge.
This tutorial demonstrates how to link your domain with your TicketSignup event website in a root domain configuration (e.g., hillvalley88miler.com, or mynonprofitevent.org).
Note: You must have an approved payment account associated with your event to link your domain to your website.
Obtaining Your Domain
In order to use TicketSignup's domain feature with your event website, you must first own a domain name and be able to modify its domain name system (DNS) records.
If you do not currently own a domain, you must first purchase one from a reputable domain registrar that allows DNS modifications such as GoDaddy.
Note: TicketSignup currently only allows .com, .net, and .org domain extensions.
Initiating Domain Request
To begin the process of using your domain with your TicketSignup event website, go to Event Dashboard >> Event Page >> Domains.

Type in the domain that you want to use with your event website and click Add Domain.

If you are using a domain with an extension other than “.com,” select the matching extension from the dropdown. Note: TicketSignup currently only allows .com, .net, and .org domain extensions.
A request for the root domain includes the “www” subdomain and vice-versa.
If you request the root domain (in this case, "hillvalley88miler"), your request will include the "www" subdomain. The reverse is also true: if you request "www.hillvalley88miler," your request will include "hillvalley88miler" without the subdomain as well.
Ownership Validation
In order for TicketSignup to set up an SSL certificate for your custom domain, we must first validate that you control the domain you are requesting to link to your event website. This process is done by installing TXT records in your domain registrar’s DNS zone editor. Note: If you have your domain’s nameservers pointing to a host other than your domain registrar (GoDaddy, etc.), your DNS records have to be installed on that system instead. TXT records are DNS records that do not impact where your website points, which means that you can migrate your domain to TicketSignup with zero downtime during the transfer process. After initiating a domain request, TicketSignup provides you with TXT records to install.

To add the TXT records to your domain, you must go to your domain registrar’s DNS editor. In GoDaddy, this can be accessed by clicking the DNS button under the Domains list. Note: This tutorial demonstrates using GoDaddy. Instructions may be different for your domain registrar’s DNS zone editor.

To add a TXT record, click the Add button.

For the Type, select TXT.

All TXT records provided by TicketSignup must be installed to complete this step. If the host or TXT values are not correctly installed, your domain request will not move to the next step. Tip: Use the copy button next to the TXT records on TicketSignup to minimize errors.

In GoDaddy, add the corresponding host and TXT values, and click Save. Note: TicketSignup provides you with 72 hours (3 days) to validate domain ownership, after which the request will be marked as expired. TicketSignup automatically checks every 30 minutes to validate domain ownership; however, it may take longer for changes to take effect depending on if prior TXT records have been installed.
Once TicketSignup detects the correct setup, this step is complete.
SSL Certificate
After domain ownership has been established, TicketSignup will obtain an SSL certificate to use for your event website. This process happens automatically in the background and should complete with 30 minutes of domain ownership validation.

GiveSignup Installation
After an SSL certificate has been obtained, TicketSignup will automatically provision its infrastructure to handle requests for your domain during U.S. business hours. Note: TicketSignup's installation window is 7AM - 8PM Eastern Time (ET) daily.

Client Installation
Once TicketSignup has provisioned your domain, you are now able to point your domain to your event website using the provided DNS records. For a root domain, two records must be installed: an A record for the root, and a CNAME for the www subdomain.

This tutorial demonstrates how to update your DNS records in GoDaddy; if you are using a different domain registrar, the instructions may vary.
Adding Your A Record
To add your A record, click the edit icon next to the A record with Name @. Note: If you do not have an A record for @, click the Add button below. Note: If you previously set up domain forwarding, this option needs to be turned off before you can edit your A record.

Fill in the DNS record with the values provided by TicketSignup and click Save.

Note: Your provided IP address may differ from the screenshot above; TicketSignup uses multiple IP addresses for its domain service. If you are migrating from another hosting provider, make sure that you only have one A record listed for @.
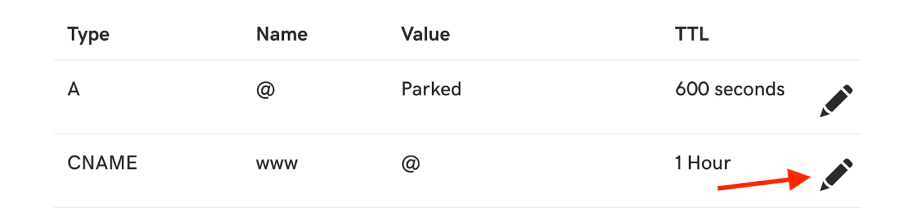
Adding Your CNAME Record
To add your CNAME record, click the edit icon next to the CNAME record with the Name www.
Note: If you do not have a CNAME record for www, click the Add button below.
Fill in the DNS record with the values provided by TicketSignup and click Save.

TicketSignup automatically checks every 30 minutes for valid domain installation using the provided DNS records.
Domain Live
Once TicketSignup detects valid domain installation, your domain is live. As long as your domain is pointed to TicketSignup, it will automatically receive security updates and SSL certificate renewals on your behalf. Since your event domain is an extension of your event website, any content modifications made to your event website will appear on your event domain.
Important! Once your site is live, do not put it in draft mode.